The What, Why and How of Adjustment Layers in Premiere Pro CC
Your edit is done! You’ve got it just how you want it and you’ve been applying effects and color corrections as you go so that everything is how you want it.
Yes!
Hit send to the client, (wait for what feels like an eternity to get feedback), and BAM! there it is – they want to tweak the overall color grade and/or change some of the effects used.
‘No problem! I’ll get right on it’ you reply.
But in your head, you’re now thinking, ‘this is going to take me forever to change all of that!’.
This is where adjustment layers come in.
If the above scenario has happened to you then you know the pain and if you’re new to the game, then make sure you learn this now without having to learn it the hard way.
Adjustment layers in Premiere Pro CC, and After Effects, or pretty much most NLEs actually, are your new best friend that you never knew you wanted in your life. They can hold all of the color correction/grade changes or effects you want, without being attached to a shot, or sequence of shots for that matter.
Let me walk you through what an adjustment layer is, how to use and them and why you definitely should use them!
How do I know what I’m talking about? Head to the DigiProTips Experience and Background page to find out how I’ve built up my knowledge over a career spanning feature film, broadcast TV and digital content production.
Watch the Video
Ok, so What is an Adjustment Layer?
You should think of an adjustment layer as a transparent (to begin with), multipurpose tool that when applied as a layer on your timeline, will affect every layer under it with any effects, media, or changes you add to it. Think of a sheet of glass that when it has an object or say, paint on top of it, changes the look of anything under it. But importantly, that object or paint can be removed or changed at any point.
Although an adjustment layer is only a layer, it can be manipulated in the timeline like any other piece of media can be. So you can cut it, move it, disable it, extend it, or whatever you need to do with it, to be able to cover the clips underneath.
This is very handy when you want to turn off an effect or color grade without changing the rest of your timeline and being able to do it very quickly too. I’ll talk more about that further down.
Adjustment layers are incredibly versatile and are a great creative aid to video editors to be able to apply changes and effects across clips or a whole sequence without causing too much disruption to the underlying edit. In a way, they are a safety net, an undo feature, and an A/B testing tool.
Once you get used to using them you won’t go back to being without them.
How to Add an Adjustment Layer to Your Timeline in Premiere Pro
There are quite a few ways to use and add adjustment layers, depending on your need for them. Therefore, I’ll show you the main way I use to add one in Premiere.
Now, I’m a stickler for organization in my projects panel, so I always have a ‘GFX’ folder/bin that contains all my effects layers, color corrections, and adjustment layers as they are essentially ‘graphics’ changes to my timeline.
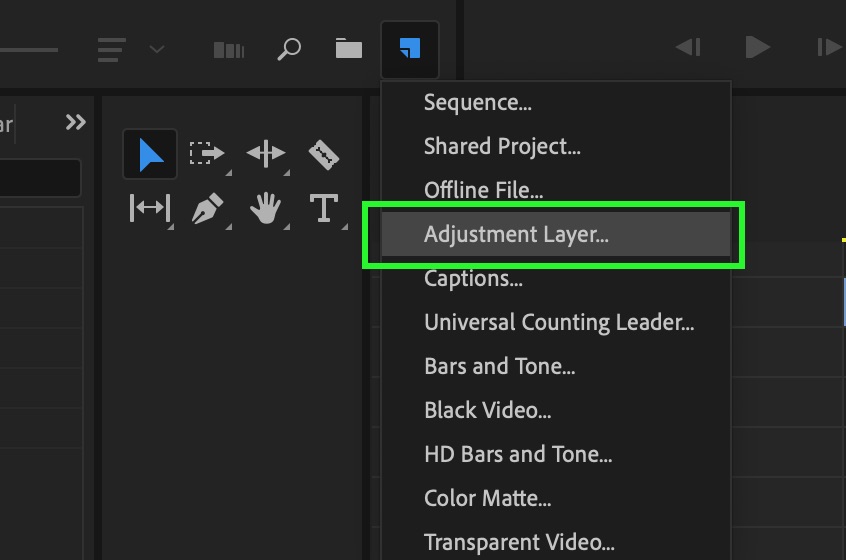
Whatever way you like to organize your project panel go to the corresponding folder/bin that will house your adjustment layers. Now head to the new item icon in the bottom right of the Project panel and choose ‘New Adjustment Layer’.
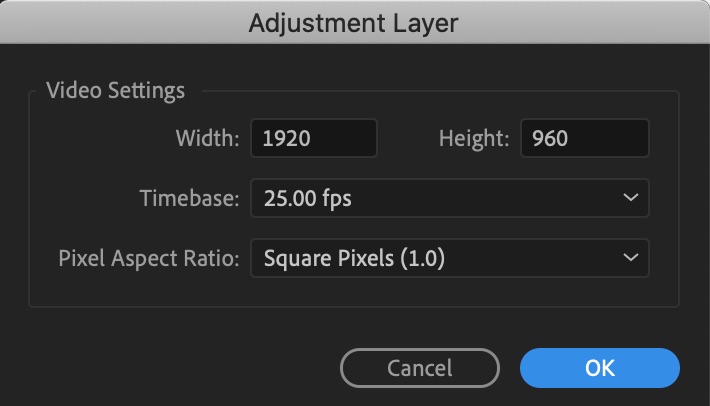
The dialog box that appears will represent your timeline sequence settings. Unless you have a specific need to change this then accept this by clicking ‘Ok’. The adjustment layer will now appear in your folder.
Don’t drag it to your timeline just yet though!
It’s important that you give the adjustment layer a name. If you are using adjustment layers correctly you will end up with a handful of them and they all just appear as ‘adjustment layer’ in your bin and on your timeline if you don’t rename them. This can quite easily and quite quickly become very confusing!
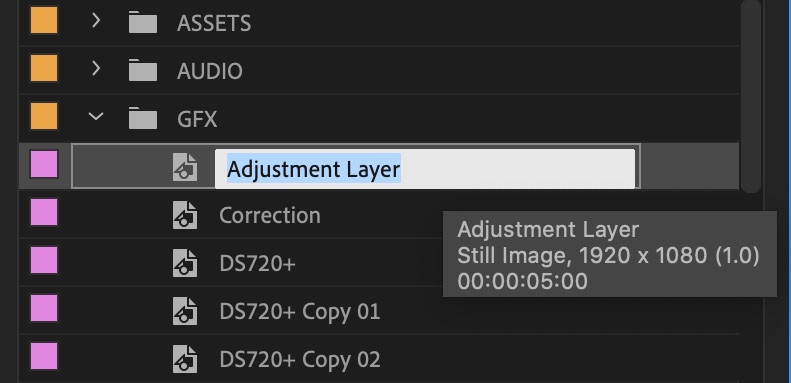
Therefore, rename your adjustment layer to what it will be used for. If it’s color correction then I usually use ‘CC’. If it’s for a vignette, blur, or any specific effect then use that name. To rename, simply click the layer in the bin and hit enter or you can double click it to rename it.
Now you can drag it to your timeline!
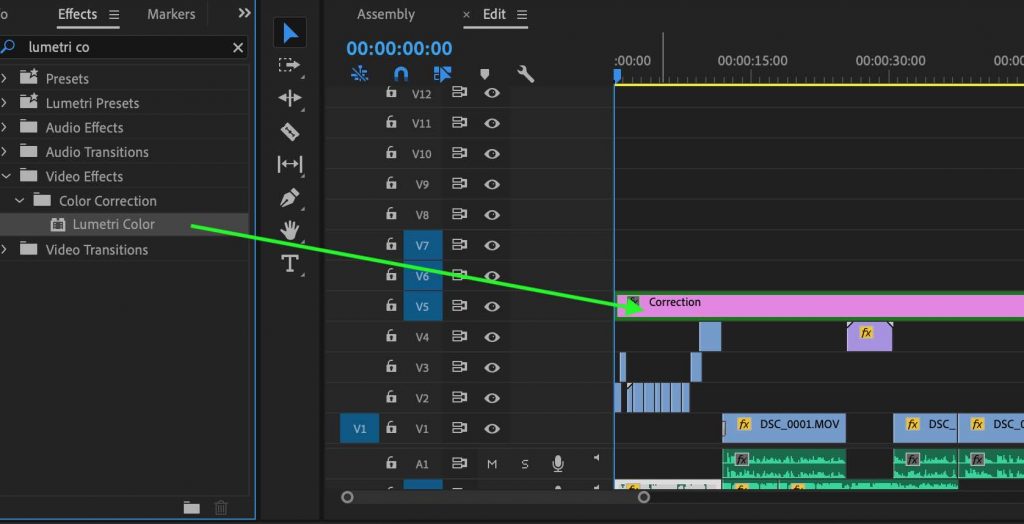
Drag it over the clips you want to affect and add the effect you want to use to that new adjustment layer.
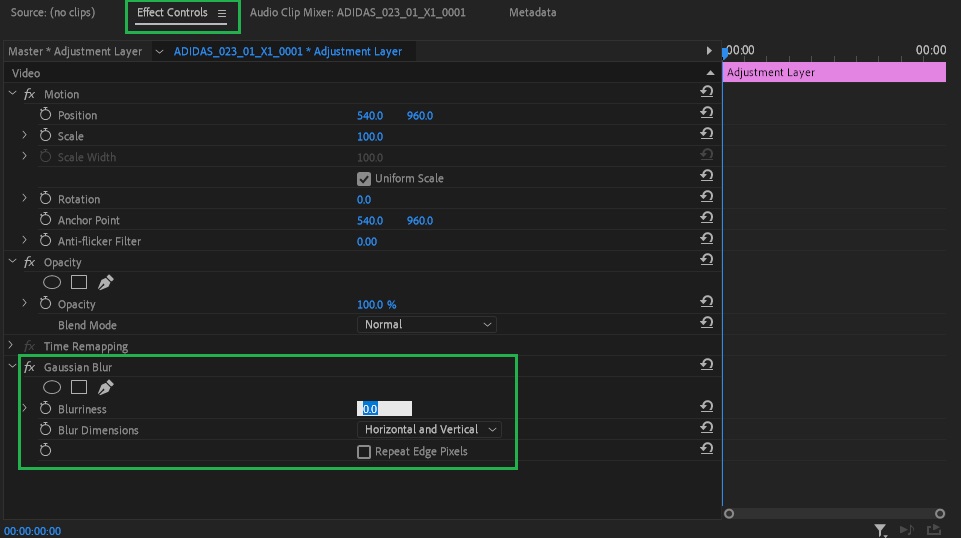
You can then alter any of the effects properties in the ‘Effects Controls’ of the adjustment layer.
Why Should I Use an Adjustment Layer?
Hopefully, it’s apparent by now that adjustment layers are there to make your future self’s life easier!
By using an adjustment layer to make changes to your clips or sequences you alleviate the headache of changing small aspects across a whole range of clips or sequences.
I’ve seen junior editors in my team spend precious editing time removing, copying, and pasting attributes across clips to try and copy specific effects settings across their clips because something had changed in their edit that needed to replicated across more than just that one clip.
That is not efficient editing and that is not working smarter, that is working harder. And here at DigiProTips we only aim to be the most efficient as we can be to leave more time for creativity or to deliver the finished product faster.
If you need even more evidence here some of my favorite uses for adjustment layers in Premiere.
Got a locked-off shot that’s used multiple times and isn’t quite straight enough for your liking? Straighten each instance of the clip once with an adjustment layer. If the director or client wants to push-in or change those shots in any way, you can do it right from that adjustment layer.
Color correction – got a sequence of shots that all need the same color correction applied to balance them with the rest of the sequence? Add an adjustment layer over just those shots and apply a Lumetri Color effect across all of them.
Color grading – got all your color correction out of the way so that your shots are balanced and you want to add a creative grade over the top? Easy. Add an adjustment layer over your sequence and grade until your creative heart’s content.
Keyframe – want to animate a property for a number of shots or a sequence? Animate on the adjustment layer. No one wants to go in and change keyframes on individual shots!
Presets – made a great animated effect on an adjustment layer and want to use it again in other projects? Save it out as a preset to use again and again!
When Would You Not Use an Adjustment Layer?
As much as I have just hyped adjustment layers up, there are definitely some instances where they are not the most efficient way to be working.
These could be when you have shots that are all differently lit and applying a single color correction/grade over your sequence won’t work for some of those shots.
Another way in which they can be slightly frustrating is when you need to cut an adjustment layer up. Maybe you have a sequence of shots but right in the middle is a completely different setup and your adjustment breaks that middle sequence. You obviously need to cut a hole in your adjustment layer to make sure that the subsection isn’t affected. Now you’re adjusting two layers instead of one.
However, a caveat to that could be to move that subsection above your adjustment layer level so that the adjustment layer is still intact and only affecting the clips you want it to. Not every timeline would accommodate this but if you can, it could save you time in the long run.
Save Time, Work More Efficiently and be More Creative!
As you can see, I’ve got a lot of love for using adjustment layers in Premiere Pro.
And hopefully, you have seen why. My love is born from experience and by reading this article you should be able to avoid the headaches I experienced back in my career.
Adjustment layers can save you a lot of time, enable you to work more creatively, and are a great habit for editors to get into using them.
It’s also worth noting that any heavy effects on an adjustment layer could lead to stuttered playback if you don’t render your timeline. Find out more on rendering and how to do it here:
Let me know in the comments below if you find them as useful as I do. Also, if you want to know more time-saving editing techniques then let me know in the comments below as well.
Remember, here at DigoProTips we want to save time, be more creative, and work smarter, not harder.
For more Premiere Pro content, check out the Most Underrated Premiere Pro Shortcuts:
DigiProTips


