If you’ve been avoiding getting to know Adobe Media Encoder up until now, well let me tell you… things are about to change.
Exporting and rendering inside Premiere Pro or After Effects is a fine and important way to work when you first start. But once you understand the principles of exporting you need to level up.
By utilizing the Adobe Media Encoder that comes bundled with either Premiere Pro or After Effects you can save time, be more creative, and ultimately work smarter, not harder and that’s what we’re all about at DigiProTips.
Let me show you what I mean.
In this article you’ll find out:
- What Adobe Media Encoder is
- How to use it with Premiere Pro
- How to use it with After Effects
- Setting up presets
- How to utilise watch folders
- Some additional Pro Tips
How do I know what I’m talking about? Head to the DigiProTips Experience and Background page to find out how I’ve built up my knowledge over a career spanning feature film, broadcast TV and digital content production.
What is Adobe Media Encoder and What Does it Do?
Media Encoder from Adobe is a separate software application that is used for the sole purpose of encoding and exporting projects from After Effects and Premiere Pro.
It has no other functions (ok maybe a couple, we’ll get on to watch folders and transcoding later) and it does what it does for a very specific reason… to allow you to carry on working while exporting.
And it’s for this very reason that you will ultimately end up saving time with this workflow and be able to spend more of that time being creative.
Adobe Media Encoder works by using the Dynamic Link to open a Premiere Pro sequence or After Effects composition and render, or encode, those to an exported video file.
Media Encoder does all of the heavy lifting during the export and only references the original sequence or composition. This means you can carry on working in Premiere or After Effects without having to wait until your export is finished. Which you would need to do if exporting from inside either application.
It’s worth noting here that if you send an export to Media Encoder and then make a change to your composition or sequence before hitting the export button in Media Encoder, those changes will not be reflected in the export waiting in your queue. You would need to delete and re-send your sequence or composition to Media Encoder to include those changes.
How to Use Adobe Media Encoder with Premiere Pro & After Effects
Working with Media Encoder for Premiere and After Effects couldn’t be simpler. For starters, the export setting dialog box in Media Encoder is pretty much a carbon copy of the export dialog box in Premiere Pro. So it feels very familiar.
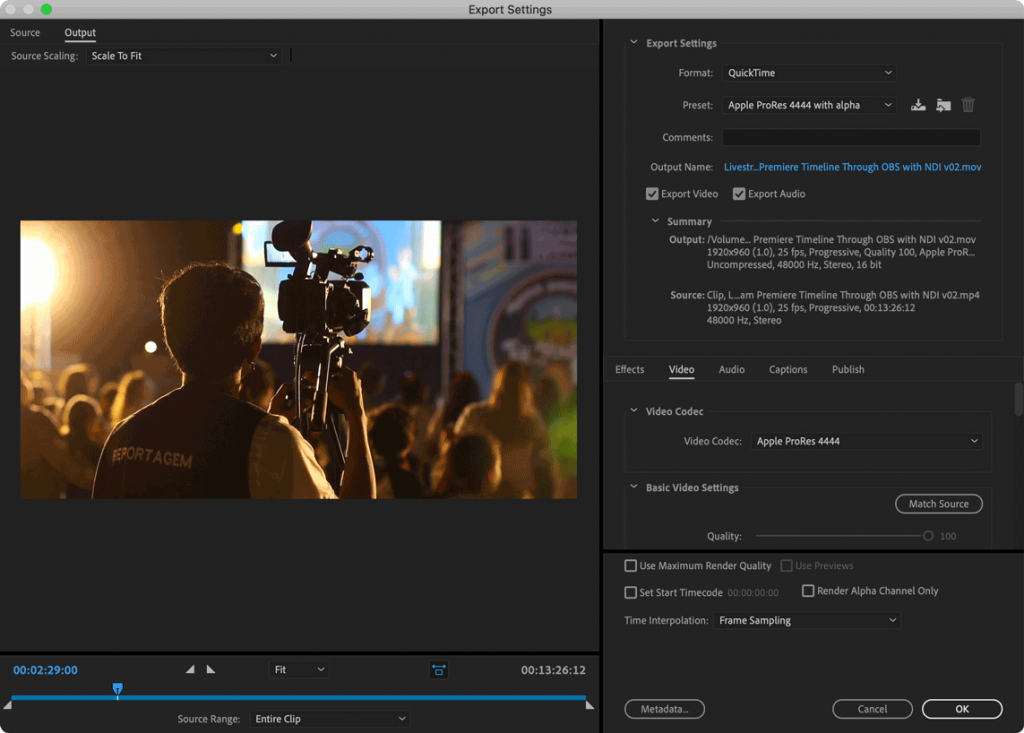
To send your sequence to Media Encoder from Premiere, use one of these following methods:
- File -> Export -> Media -> Click Queue at the bottom of the dialog box
- CTRL/CMD+M -> Click Queue at the bottom of the dialog box
To send your sequence to Media Encoder from After Effects, use one of these following methods:
- Composition -> Add to Adobe Media Encoder Queue
- File -> Export -> Add to Adobe Media Encoder Queue
- ALT/Opt+CTRL/CMD+M
Media Encoder will start to load if it wasn’t open already, and your project export will appear in the Media Encoder Queue. If Media Encoder was open already then your project will just appear in the queue.
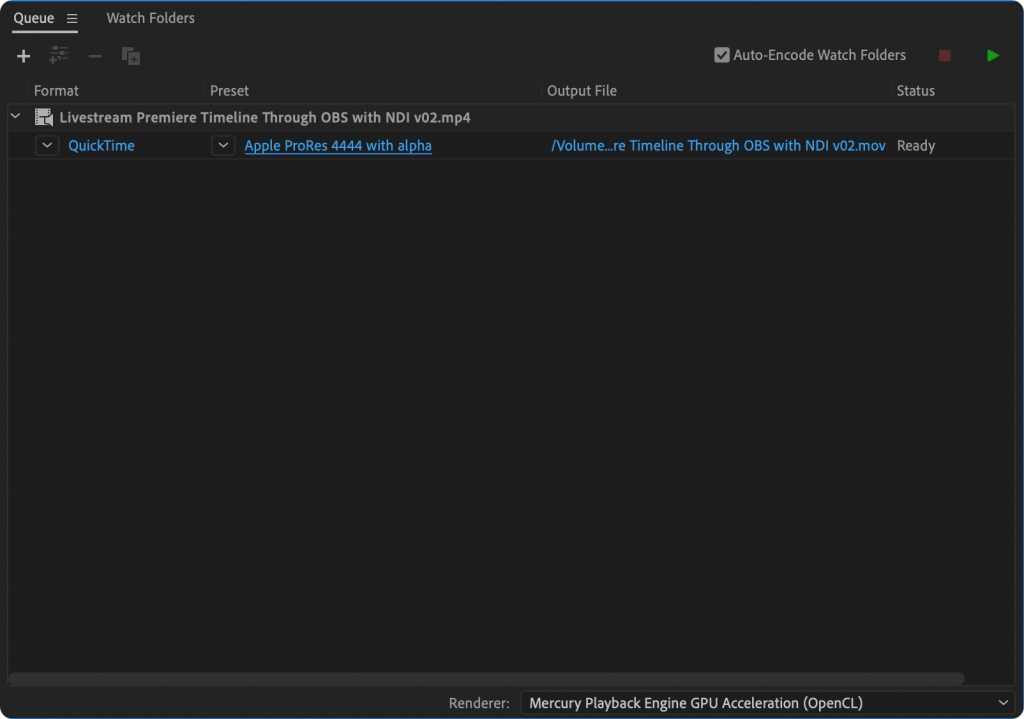
The Media Encoder Queue is where all your export file tasks get queued up ready for export. You can have many, many, tasks queued up here and when we get onto watch folder this will quickly become the case.
Once a task is loaded into the queue you have a few settings available to change.
Clicking either of the first two blue highlighted text fields will open up the ‘Export Settings’. This is pretty much the same export dialog as the in-built exporter tools in Premiere.
Choose your export settings and click Ok.
The third option is where you want to save your exported file, the output destination. You’ll want to make sure this is saved somewhere other than the default setting so that you can find it easily. The best practice is to save to a destination not on the same hard disk that you are reading from as well, that way you are not reading and writing to the same disk at the same time.
Now all you need to do is click the green play button to export.

Note. Pay attention to the ‘Renderer’ option at the bottom of the queue panel. In most instances you want to utilize your GPU to help export, so change this if this is not already the case.
Once you have started to export a preview will start in the bottom ‘Encoding’ panel and a blue status bar will start to crawl along too.
Using Media Encoder Without Premiere Pro or After Effects
Sending compositions and sequences to Media Encoder from Premiere Pro and After Effects aren’t the only ways to use Media Encoder.
You can also drag and drop files from your file browser to the queue area to add them as a transcoding task. You could also double-click the queue area to open up a file browser to locate a file to add as well.
You can then use Media Encoder to transcode (change the wrapper and/or codec of a video file from one to another) your media without having to go through any other software.
This is great if you have a master delivery quality video file that you want to create a web or social version from that is of lower quality and file size. You don’t need to re-open Premiere or After Effects, you can just transcode the finished file in Media Encoder, which is ultimately much faster.
However, if you have the time, it is always better to export it properly from the original software even if you create a much lower quality file. Re-encoding pixels that have previously been exported will result in lower quality than exporting from the original source, i.e. your timeline or composition.
Saving Export Presets
A very useful feature in Media Encoder is the ability to save export presets.
So, instead of changing the export settings every time you send a task to Media Encoder you can just click to choose a predefined preset and know that your media will be exported in the right settings every time.
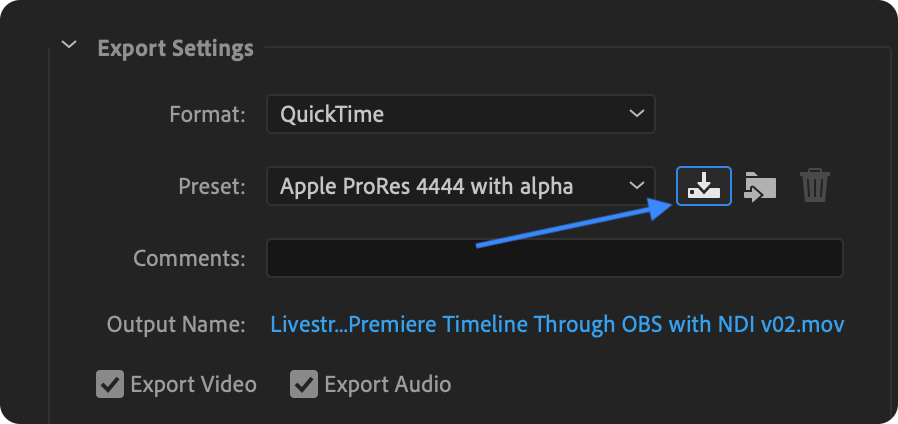
The easiest way to create a new preset is to add a task to your queue, choose the export settings you would like to use each time and then click the ‘Save Preset’ icon. This will then open a dialog box for you to name your preset.
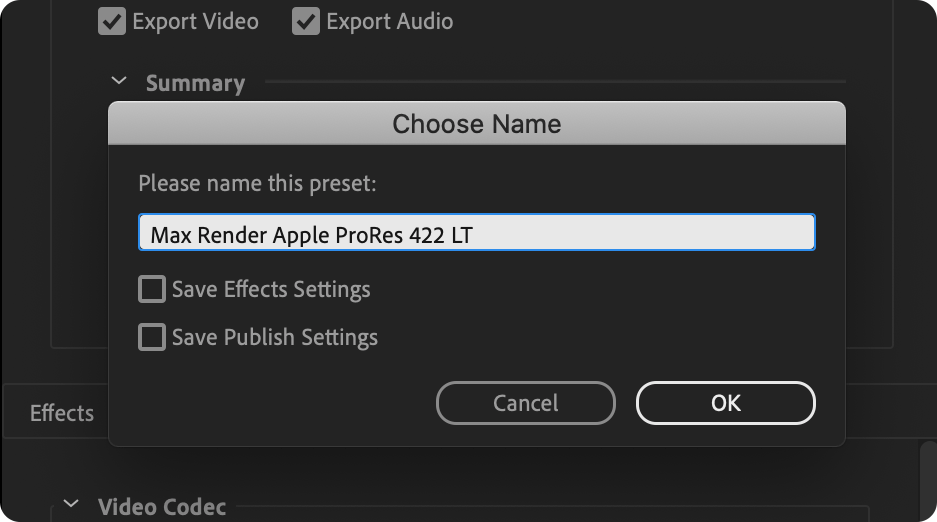
Now, whenever you add a task you can just click and drag your pre-made preset from the Presets panel over to your queue task and drop it onto it.
Watch Folders – What Are They and How do You Use Them?
Watch folders are a golden nugget of a feature that doesn’t get utilised half as much as it should do.
Essentially, a watch folder is a folder on your computer, network, or any folder that your computer has access to (and therefore Media Encoder) that the software will keep an eye on in the background. If a file drops into this folder, Media Encoder will automatically add it to the queue as a transcode task and start that process.

You will have previously set up the task so that you know what format and codec your files are been transcoded into and where they are been exported to as well.
What is this useful for?
Well, for any videographers reading this it will have instantly sparked a light bulb moment… Transcoding rushes into intermediate codecs or for creating proxy files right off the bat.
Yep, so once you have dumped your rushes onto your storage device Media Encoder will instantly grab them and start transcoding them for you without you having to lift a finger. It does this in the background too so you can carry on with other tasks while this is happening.
How to Set Up a Watch Folder
Head to the queue panel and click the ‘Watch Folder’ tab next to ‘Queue’.
Here click the plus button to add a watch folder and choose the encoding settings you wish to use when transcoding your media.
Once you have added one encoding setting, you can click the middle button next to the plus to add another encoding setting. Meaning you can have multiple transcodes of each file that drops into that watch folder. Very useful if you want to create intermediates and proxy files.
The last thing you need to do is go back to the ‘Queue’ tab and ensure the checkbox for ‘Auto Encode Watch Folders’ is ticked so that Media Encoder will start transcoding as soon as it notices new files appear in the watch folders.
Bonus Pro Tip
There’s a lot of great ways to use Media Encoder in your digital video production workflow but there are always some hidden and lesser-known features that make it that much more impressive as a piece of software.
Additional Output
The best of these features is to have multiple outputs from one queued task. You can use this to output different formats and/or codecs but you can also use it to export different aspect ratios of the same composition or sequence too.
If your video has been shot or created with multiple aspect ratio formats in mind then you can add an additional output and change the aspect ratio to encode all of those at the same time as your main output file.
This is a great way to save time and get the most from your export without dipping in and out of export settings.
Save Time, Work Smarter, Not Harder
As you can see there are so many advantages to using Media Encoder with Premiere Pro, After Effects and as a transcoding tool.
It really does save you time and ultimately enable you to use that extra time to be more creative.
Get used to working with it and you’ll be smashing out exports far quicker than you ever were before.
If you found this tutorial useful then let me know in the comments below and if there’s anything you would like to learn next then also let me know there too.
For more on export, render and encoding in After Effects then check out this article here:
And for exporting up to ten times faster in Premiere Pro then check out this guide here:
DigiProTips


