Exporting can be a LONG process… It can be very long!
However, that doesn’t have to be the case. In fact, there is a way that you could export your media from Premiere Pro up to ten times faster than you currently do with Smart Rendering.
How?!
Well, it utilises a workflow that Adobe has had in Premiere for quite a while now but not many people know about it and Adobe don’t promote it very well either.
It’s called ‘Smart Rendering’ and it utilises your sequence settings and previews.
Using previews in your exports can save your machine A LOT of time and energy when exporting, as it doesn’t need to re-render the material in your timeline.
Let’s dig in and show you exactly how to do this.
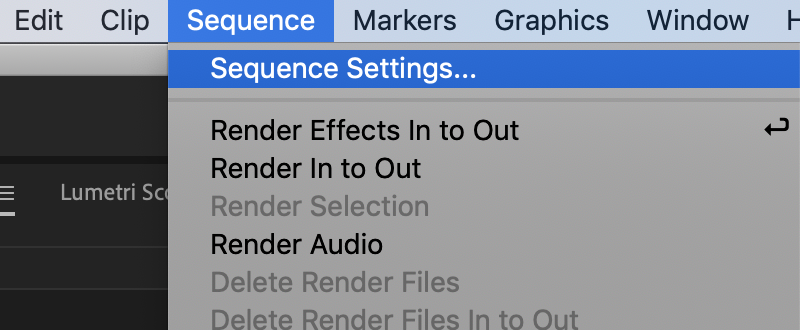
Ok, so first off, you need to open up your sequence settings. So go to ‘Sequence’ at the top of Premiere and choose ‘Sequence Settings’.
Once the settings window opens up scroll to the bottom where it has your preview options. This is the first important step to using Smart Rendering.
Here is essentially where you are going to decide your final export format. That sounds counterintuitive but it will make sense later.
Now, it’s important to note that this workflow will only work if your final destination format is in a .mov or .mxf wrapper. It will not work if you are exporting as H.264 in a .mp4 wrapper.
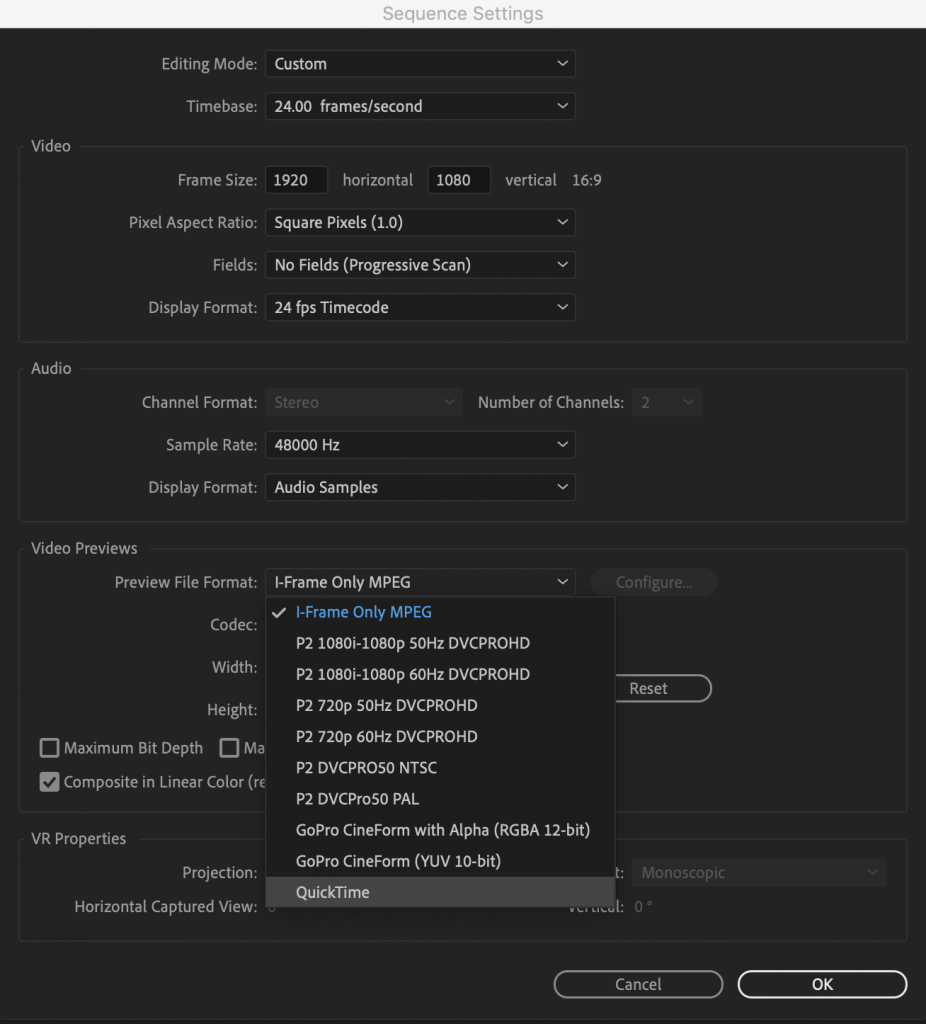
Click the dropdown list and choose either MXF or Quicktime as your Preview File Format (if your sequence is set to a preset then you can choose ‘Custom’ at the top of the window to enable different format options in your preview options). Then you need to choose your desired codec for the wrapper in the dropdown next to ‘Codec’.

Once you have done these two steps hit ‘Reset’ next to your timeline dimensions to ensure you have the correct aspect ratio for your format and then click ‘OK’.

Great, so now I can export quicker?
Almost.
What you need to do now is edit.
You need to edit and whenever you step away from your desk you need to render your timeline.
Why?
Because you need to create preview files and the best time to do this is when you are away from your desk and not needing to edit.
You want as much of your timeline to be pre-rendered as possible. So whenever you go for a coffee, speak with a colleague or go to the toilet, whatever it may be make sure you hit that ‘Render in to out’ option under Sequence at the top of Premiere.
Once you have your previews THEN you can export faster.
The reason behind all this is that you are going to use these previews in your final export. That’s why we needed to make sure the sequence settings for previews are set to our desired output format.
So, to utilise Smart Rendering go to the export window and hit ‘Match Sequence Settings’. Then, check everything is how you want it, it’s named how you want and going to the right destination but DON’T hit export yet. You need to check one very important box:
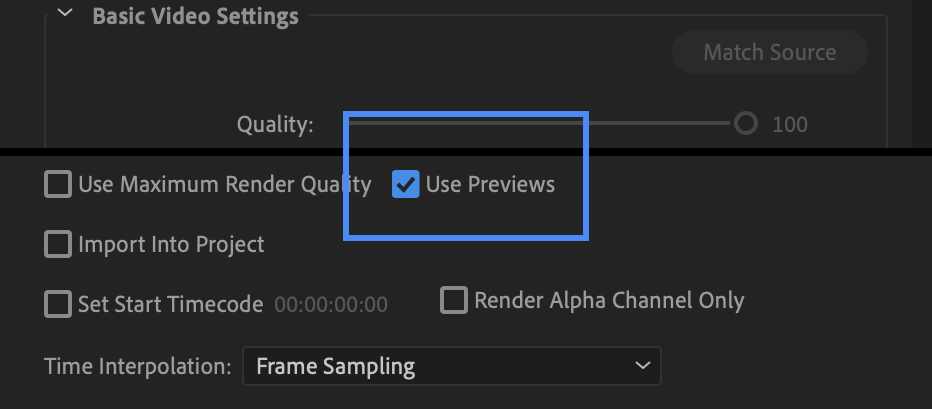
Make sure you check the ‘Use Previews’ box before you export. This will force Premiere or Media Encoder to use your pre-rendered timeline previews as part of or all of your final export.
That means your machine isn’t re-rendering material that it has already rendered for your previews and it can basically just skip those sections and copy the pre-rendered sections into the final media output file.
Et viola!
Your export should have at the very least doubled in speed compared to if you hadn’t used this workflow. In some cases it can be up to ten times quicker!
Go check it out, right now! You won’t go back after learning this.
SUBSCRIBE
If you found this video useful and would like to see more then you can subscribe to our channel here: https://digiprotips.com/Subscribe
For extra quick tips like this check out more Quick Tip Tuesday topics here: https://digiprotips.com/category/quick-tip-tuesday/
DigiProTips

Pingback: How to Improve Your Video Editor Skills With a Wacom Pen Tablet - DigiProTips
Pingback: The Equipment Needed to Start a Youtube Channel - for the Lowest Budget - DigiProTips
Pingback: Can You Export a Video Without Rendering? – Videoprentice