Track mattes are an essential tool in the arsenal of any motion graphic deisgner and visual effects artist. Getting to know them in After Effects should be one of the first things a budding MoGraph artist should do.
Track mattes are incredibly versatile tools that get used within the VFX industry, motion graphics, stills photography and video editing industries every single day but for many their names and their uses go underappreciated or misunderstood.
I’m going to help break down those barriers, show you why track mattes are so useful and how to use them effectively in your After Effects workflows.
The Quick Answer to Using Track Mattes in After Effects
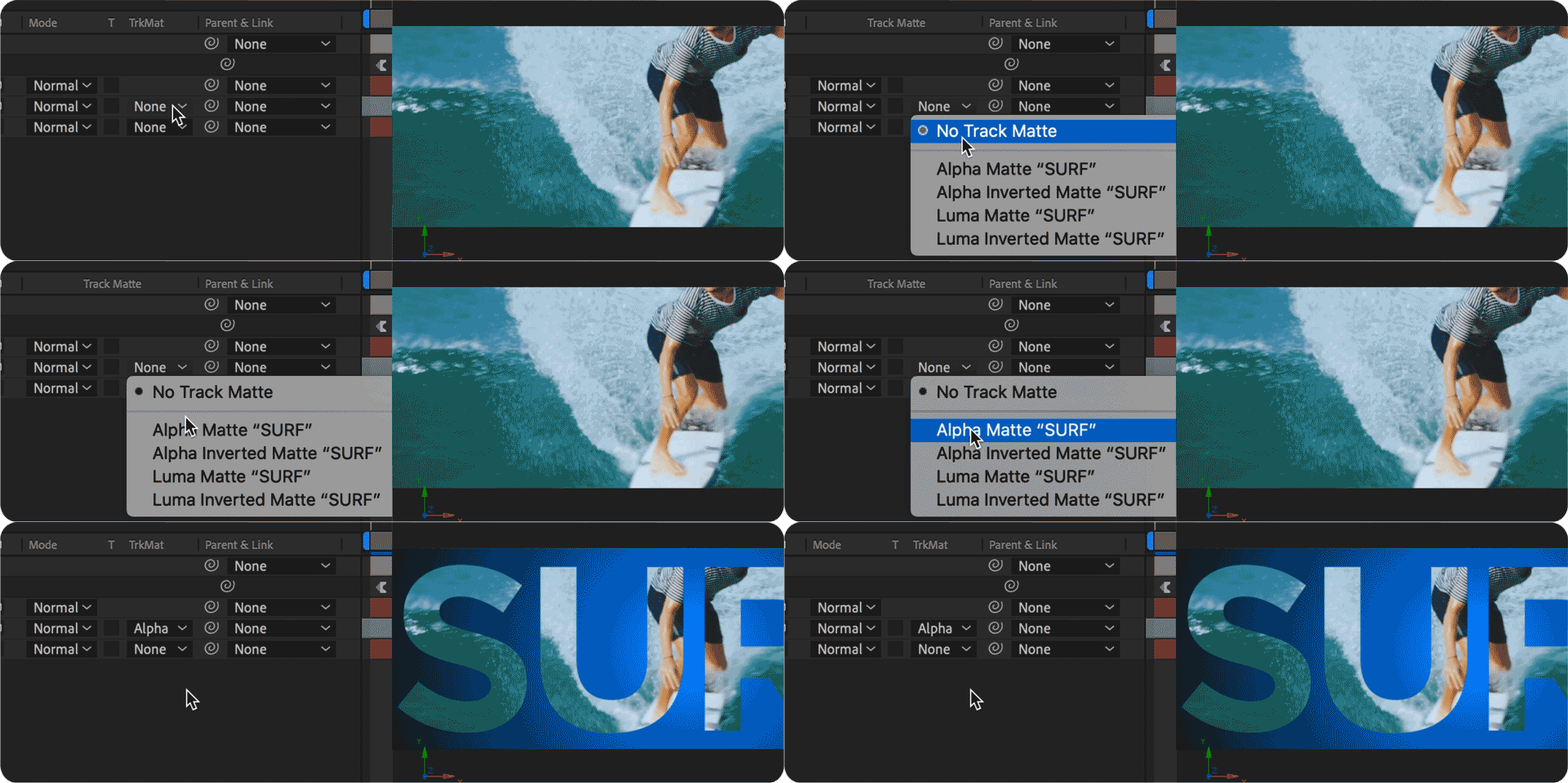
Using a quick example of a text layer above a piece of video we can only show through the video through the text.
Step 01 – In your composition add a text layer and enter some text.
Step 02 – Now add your video layer underneath the text layer.
Step 03 – Add a solid layer (CTRIL/CMD +Y) for a background layer .
Step 04 – Head to the ‘TrkMat’ column next to your timeline and using the dropdown menu next to your video layer choose ‘Alpha Matte’.
This will instantly change the view in your composition preview window to show the text as your video layer. What is actually happening is that the video layer is referencing the text layer’s alpha channel to show video only where there are luminance values (the text itself). I’ll explain more on this below.
What Are Track Mattes?
Essentially a track matte is any piece of media such as a still image, graphic, text, shape or video that is used to create transparency in another layer within your composition. The track matte selects only a portion of a layer and shows the layer beneath what is not selected.

So in the example above, the track matte has selected the luminance values of the text layer above it and shows the video layer through that luminance but shows the solid BG layer underneath that.
Track mattes are great for creating reveals, keying, creating unique shapes and many more uses. Unlike masking layers track mattes remain independent of any other layers in your composition or project.
This means that you can achieve animation and visual effects much more efficiently than you would be able to with masks, requiring fewer steps to achieve the same effect.
Where Are The Track Matte Tools In After Effects?
The track matte options should be present by default but if for whatever reason they are not then you can find them by toggling the ‘Toggle Modes/Switches’ button under your columns next to your timeline.

You can also right click on the column headers and choose ‘Columns -> Modes’.
And there is always the keyboard shortcut of F4.
This should show you the columns for the blending modes used on a layer and track matte dropdown menu options.
Applying a Track Matte in After Effects
You can follow the Quick Answer above to get a feel for how to apply track mattes but in essence, you just need two layers:
1 – A top layer that will provide the second layer the alpha or luminance values to reference.
2 – A bottom layer that will be used as the fill layer referencing the layer above it.

When the track matte is applied you will only see the content of the bottom layer. The top layer will essentially turn itself off and will only be used as a reference by the bottom layer.
The Different Track Matte Options
There are four different track matte options that you can choose from the dropdown menu. They all have specific functions and result in different effects. The options are:
- Alpha Matte
- Alpha Inverted Matte
- Luma Matte
- Luma Inverted Matte
Let’s look briefly at each and what it does.
Alpha Matte
By using an ‘Alpha Matte’ track matte you are telling After Effects to use the alpha channel of the layer above it as a mask for the layer below. This will use any pixels with an opacity above 0% to create a mask.
Alpha Inverted Matte
The opposite of the alpha matte and inverted alpha matte will use the negative space around the alpha channel from the layer above. This will therefore use any pixels with an opacity of 0% as if it had 100% opacity.
Luma Mate
Rather than using the alpha channel information, the luma matte uses luma values (or brightness levels) of the top layer to create a mask for the layer underneath it.
Luma Inverted Matte
This does the opposite of the luma matte and instead of using the brightest areas of the top layer, it will use the low-luminance or dark areas of the top layer to create a mask for the bottom layer.
The Difference Between Luma Channels and Alpha Channels
It can be quite confusing at first to understand that alpha and luma are not the same. Especially as altering the opacity setting of a layer appears to change the brightness level of that layer.
While at first glance that appears to be what is happening it’s actually quite different from that.
You see, the alpha channel refers to how opaque or transparent a pixel is. By reducing opacity you are letting more of another layer’s pixels show through.
Whereas, with luma channels, these are all to do with the brightness of a pixel and it is split further into three separate channels of Red, Green and Blue (RGB). Their values range from 0 to 255 (I know, confusing right?!). 0 represents the darkest value, i.e. black and 255 represents the brightest, i.e white.
You can change the luma value of a single RGB channel or multiple but luminance is recorded across all channels, so even if you reduce red and green to 0 and kept blue at 255 your overall luminance would still be 255. The higher the value, the brighter a color will appear.
When Should You Use Track Mattes in After Effects?
My response to that would be to try and use a track matte whenever you think of using a mask.
Does the job at hand require a tedious and laborious amount of masking? Maybe a track matte could do the same job without the need for tracking also?

Text ‘masks’ are a great example. Instead of tracking individual pieces of text, you can create a ‘window’ by using a track matte.
Want to select one color in a shot and alter it across the footage? You can duplicate your base video layer, apply a linear color key to the top and select the color from the shot you want and then select a luma matte on the bottom layer to use that top color as a mask.
The great thing about this technique is that there’s no tracked masking involved and all changes are kept on separate layers. Saving lots of time and enabling much more creativity.
And ultimately that’s what this tutorial and DigiProTips is all about, working smarter, not harder.
For more After Effects tutorials, why not check out my guide to bounce expressions:

Or find some of the more underrated but very useful shortcuts right here:

DigiProTips


