Rendering in Premiere Pro is not only simple to do but it’s also a great habit to start getting in to. Let’s take a look at how we do it right now.
Are you experiencing some strange playback issues or seeing an array of coloured lines above your timeline? Well, it’s probably worth knowing about rending in Adobe Premiere Pro and how to do it.
If any frames are being skipped, effects and transitions aren’t working or the playbar pretty much just stops when it gets to a red line above your timeline then your project needs rendering.

Rendering is a workflow that allows you to playback at full speed and quality but it does take a little time to do. I’ll show you how get the best performance in Premiere Pro CC with rendering right now.
How do I know what I’m talking about? Head to the DigiProTips Experience and Background page to find out how I’ve built up my knowledge over a career spanning feature film, broadcast TV and digital content production.
The Quick Answer to Rendering in Premiere Pro
Select an area of your timeline you would like to render, either via the in and out shortcuts or by dragging a selection box around the area.
You can now head to Sequence-> Render In to Out or Sequence-> Render Selection.
Alternatively you can hit Return on your keyboard to render any effects in the timeline straight away.
Why Do You Need to Render and What Does Rendering Do?
When you import media into a project, Premiere Pro doesn’t copy this media anywhere or ingest it into a different codec, it references it directly from its stored location. This is what makes Premiere such a quick editing program to get started with. You can throw anything onto the timeline, from anywhere on your computer and get editing.
This helps keep project file sizes small and manageable but the downside is that Premiere Pro is then very much dependent on your computers hardware specs and the media type you have given it to use rather than its own codec it knows it can playback properly. This is where we start to see lagging during playback.
When you start adding effects and transitions into the mix then Premiere Pro can have a difficult time keeping up with the task of playing back in real time. This especially true if it’s having to reference media on a slow drive, hasn’t got great hardware, playing back very high resolution files or having to negotiate a very intensive effect on top of a clip.
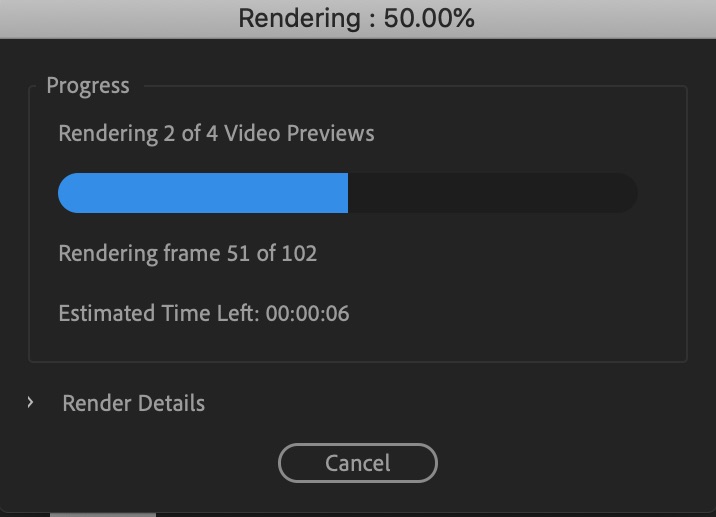
Rendering part or all of your timeline means that Premiere Pro will go and export a version of that clip or timeline in the background for its own use in playback. This is called a Preview file. When Premiere has rendered a preview file it will use this new file to playback with rather than referencing the original media file and un-rendered effects.
It will play this version of the clip every time thereafter so long as no changes are made to that clip, nest or adjustment layers. If changes are made Premiere will need to re-render to create a new Preview file.
So, What Do the Colors at the Top of the Timeline mean?
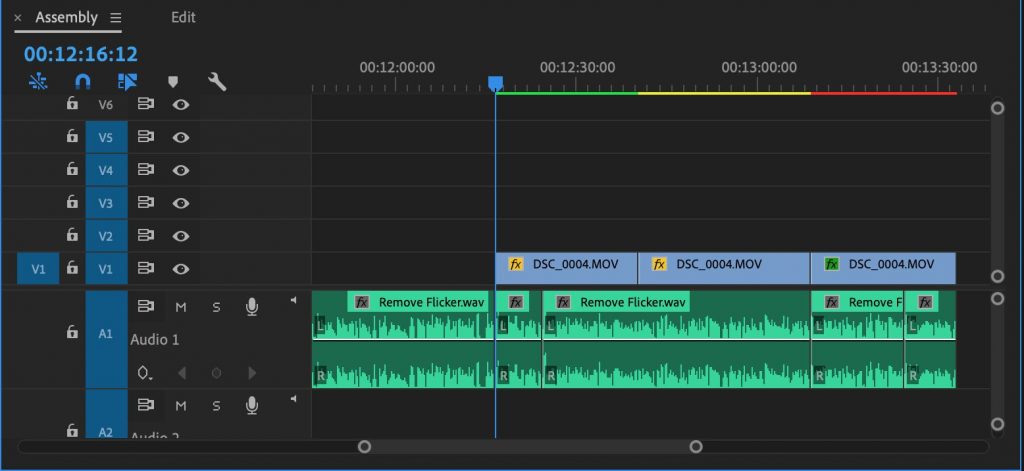
You will have noticed when adding a clip to the timeline that sometimes Premiere Pro will show a yellow or red line above it on the timeline. Sometimes there may be no coloured line at all and then other times there will also be a green line there.
They all have a meaning for how accurately Premiere Pro can playback that part of the timeline.
No Color
When there is no color above a clip in the timeline it means that there is no rendered preview file that Premiere Pro is referencing but that the media type, codec or resolution is simple enough for Premiere to playback without rendering.
The better the hardware specs of your system the more often you will see no coloured lines above your timeline.
Yellow
A yellow line above a clip in the timeline indicates that there is no associated rendered preview file for the clip but that Premiere Pro believes it will need to render as it goes, frame-by-frame and therefore the clip isn’t as simple to playback back as when there is no coloured line.
Yellow still indicates that Premiere Pro thinks it should be able to playback at full-speed.
Red
A red line above a clip shows that there is no rendered preview file for the clip but unlike the yellow bar Premiere Pro doesn’t think it can play this section back at full speed or full quality.
The area in red is either a file format that is harder to playback, is a large resolution, has had a complex effect applied or multiple effects applied to it.
Rendering is therefore advised for this section.
Green
Green then, is when Premiere Pro has rendered a preview file and is going to use that file to reference while playing that section of the timeline.
This area should now play without any noticeable issues.
How to Render in Premiere Pro
Rendering is a habit that you should really start getting used to as an editor. By rendering your timeline at opportune moments, such as coffee breaks or lunch breaks etc. then you can really speed up your workflow and start working smarter, not harder (that’s what DigiProTips is all about!).
In fact, if you are exporting your finished edit in a high-res delivery format then you could save yourself even more time in the final export by using smart rendering. I’ve got an article on exactly what that is and how to do it here:
Back to rendering.
Before you render, you need to define the area that you wish to be rendered. There’s no point rendering an area of your timeline that doesn’t need to be rendered, that will only slow you down. So there are a couple of ways that you can tell Premiere exactly what to render in your timeline instead.
Define the Area to Render With In and Out
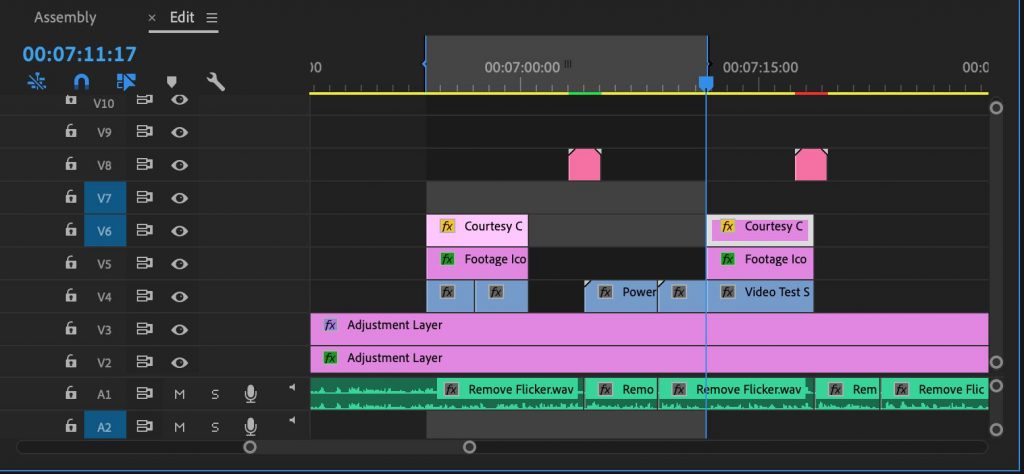
To render a section of your timeline only, drag the playhead to the beginning of that section and then press ‘I’ on your keyboard to mark an In point. Now drag the playhead to the end of the section and press ‘O’ to mark an Out point.
If you want to render the whole timeline then you can leave the timeline without any in or out points or you can go to the end of your edit and mark just the Out point.
Define the Area to Render With a Selection Box
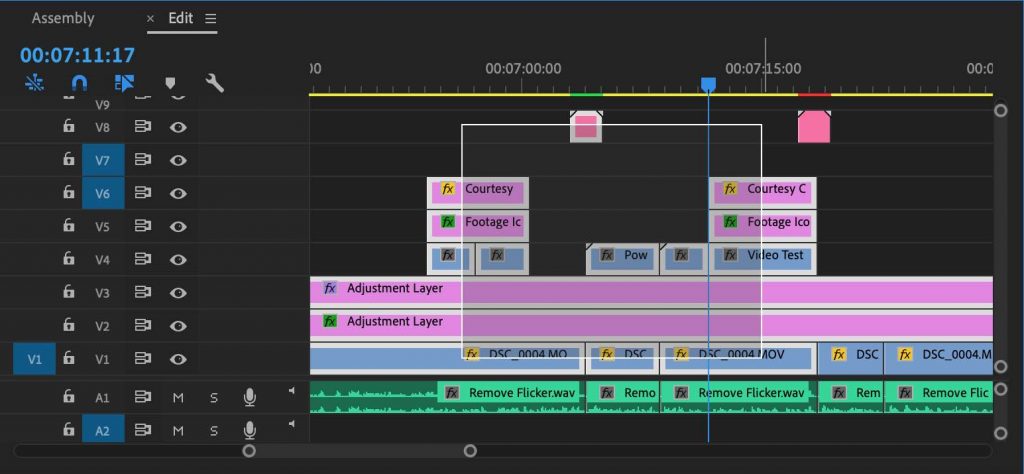
If you want to render just a specific clip or selection of clips, then you can drag a marquee box around those with your mouse or alternatively you can Control/Command click the clips you wish to render and have just those highlighted.
Render the Defined Area
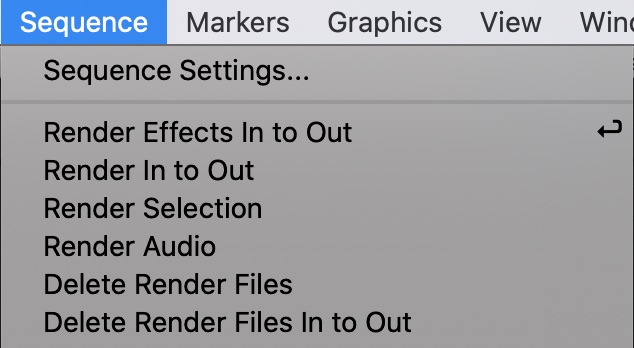
Now that you’ve defined the area you wish to render its time to render. If you head to Sequence at the top of the window you’ll now see four options:
Render Effects In to Out
This option will render just the effects within your timeline to help with playback issues of just effects.
You can also do this by pressing Return on your keyboard at any time whilst editing.
Render In to Out
This option will render the portion of your timeline that you defined just a minute ago by marking an In and Out point. Premiere will create a preview file of everything with this option, not just the clips with effects applied.
Render Selection
Similar to the above, this option renders everything within the selected clips on your timeline. So this will be the portion you selected with marquee box or the select clips you picked out by Control/Command clicking.
Render Audio
The fourth option is to render just the audio of your defined area. If you have a heavily mixed edit, in terms of audio, then this is a good option to use.
By default Premiere Pro does not render audio alongside video when you choose one of the previous three options above.
Pro Tips & Notes on Rendering
The Render Bar

When rendering, you will notice that the render bar doesn’t seem to progress fluidly, it jumps and can speed up and down a lot. This is because in the background Premiere is rendering each frame of your work area but only displaying a section as completed when its finished the last frame of a clip or effect.
So although you can see the frame count going up the percentage and blue bar only increase when a whole clip or effect is rendered.
In fact, you should be able to see Premiere Pro start to designate sections of your timeline as rendered by green lines appearing above them in the timeline as the render process continues.
Best Practice Tips for Rendering
- Use an SSD (Solid State Drive) for storing your media on, that is separate to where you project files are saved.
- Render little and often, make it as much of a habit as saving your project is.
- Render what you need. If you accidentally choose to render your whole timeline then you can cancel it at anytime and Premiere will save the sections it did render. In fact, this can be a useful habit to get into to quickly render the start of your edit and rewatch in full speed without defining the area first.
- Use Smart Rendering to save substantial amounts of time in your final export. More on that here.
Playback Issues Are a Thing of the Past
Now that you know why you need to render and how to do it, you should have no more problems playing back your timeline.
Once you start using rendering as part of your workflow you will find that your editing proficiency starts to improve and you’ll have more time to be creative or deliver that project faster than you would otherwise have been able to.
That’s working smarter and not harder.
If you found this tutorial useful and would like to read more like it then let me know in the comments below what I can help you with next.
For more Premiere Pro tutorials why not check out some of the Most Underrated Keyboard Shortcuts:
And for how to render from After Effects check out this article on it here:
DigiProTips

