Create an Organic Bounce Animation in After Effects, In Seconds, Using an Expression
In the real world, objects don’t fall to the ground and stay there, they usually have at least a little bounce to them. The same should be true for animated objects. Using a bounce expression in After Effects can achieve this effect with little to no input beyond the expression. I’ll show you how.
How do I know what I’m talking about? Head to the DigiProTips Experience and Background page to find out how I’ve built up my knowledge over a career spanning feature film, broadcast TV and digital content production.
The Quick Answer for Adding a Bounce Expression
Create your basic animation and then alt-click the property you want to ‘bounce’.
In the test field add the following expression:
amp = .1;
freq = 2.0;
decay = 2.0;
n = 0;
time_max = 4;
if (numKeys > 0){
n = nearestKey(time).index;
if (key(n).time > time){
n–;
}}
if (n == 0){ t = 0;
}else{
t = time – key(n).time;
}
if (n > 0 && t < time_max){
v = velocityAtTime(key(n).time – thisComp.frameDuration/10);
value + v*amp*Math.sin(freq*t*2*Math.PI)/Math.exp(decay*t);
}else{value}
Change the amp, freq or decay to influence the bounce animation.
Credit where credit is due, to Dan Ebberts who came up with this incredible expression and shared it with the community.
Breaking the Bounce Expression Down
Using an expression to create bounce is a great time-saving workflow that produces incredible results (that’s working smarter, not harder). All you need is two keyframes and After Effects will do the rest. It will interpolate the velocity of movement on that layer’s property for you by using the data within this expression’s code.
The above expression may seem daunting at first but you really don’t need to know exactly how the code works, you just need to know how to manipulate a few parameters within it.
These are ‘amp’ for amplitude/elasticity, ‘decay’ for decay/gravity and ‘freq’ for the frequency/maximum number of bounces.

Amplitude/Elasticity – Value ‘amp’
Amplitude/Elasticity you should think of like a rubber band or bungee cord, the harder you pull it the more it bounces back in the opposite direction.
The elasticity property of the expression, therefore, changes how much bounce the property will have in the animation. You can also think of it as a measure of ‘stiffness’. The lower the number of this value the more ‘stiff’ the bounce will feel. To make it looser just raise the value of ‘amp’.
Decay/Gravity – Value ‘decay’
Decay/Gravity is a little self-explanatory, it changes the inertial density of the property.
The more gravity you give an object (without elastic properties) the less it will bounce on each subsequent bounce.
The ‘lighter’ a property’s gravity value the more bounce it will have.
Alter the value to see its effect on the ‘heaviness’ of the bounce on that layer.
Frequency/Maximum Number of Bounces – Value ‘freq’
As it says on the tin, freq will give a definitive limit to how many times the layer/object will bounce based on this value.

Limits to the Bounce
The above expression is a great tool for creating organic-looking bounce to an object or layer but after a bit of playing with the expression and where it’s most useful, you’ll start to notice its limits too.
For complete control over a bounce animation and how it looks, you would want to use the graph editor to precisely manipulate the keyframes and their velocity. However, that is not only more involved than just adding an expression from a learning point of view but it also takes more time to do, which isn’t always a luxury on projects.
The Quick Way to Manually Add Bounce With Keyframes
For those of you who are new to keyframing and expressions, I’ve got an article on keyframing right here and if the above expression is too daunting, I’ve also got a quick little trick to add subtle bounce with only a few keyframes that you can copy to any layer property afterwards.
Now, bear in mind that this is by no means a complex animation and it has had no refinement but for beginners, it could give you some subtle bounce to add an extra level to your animation quickly.

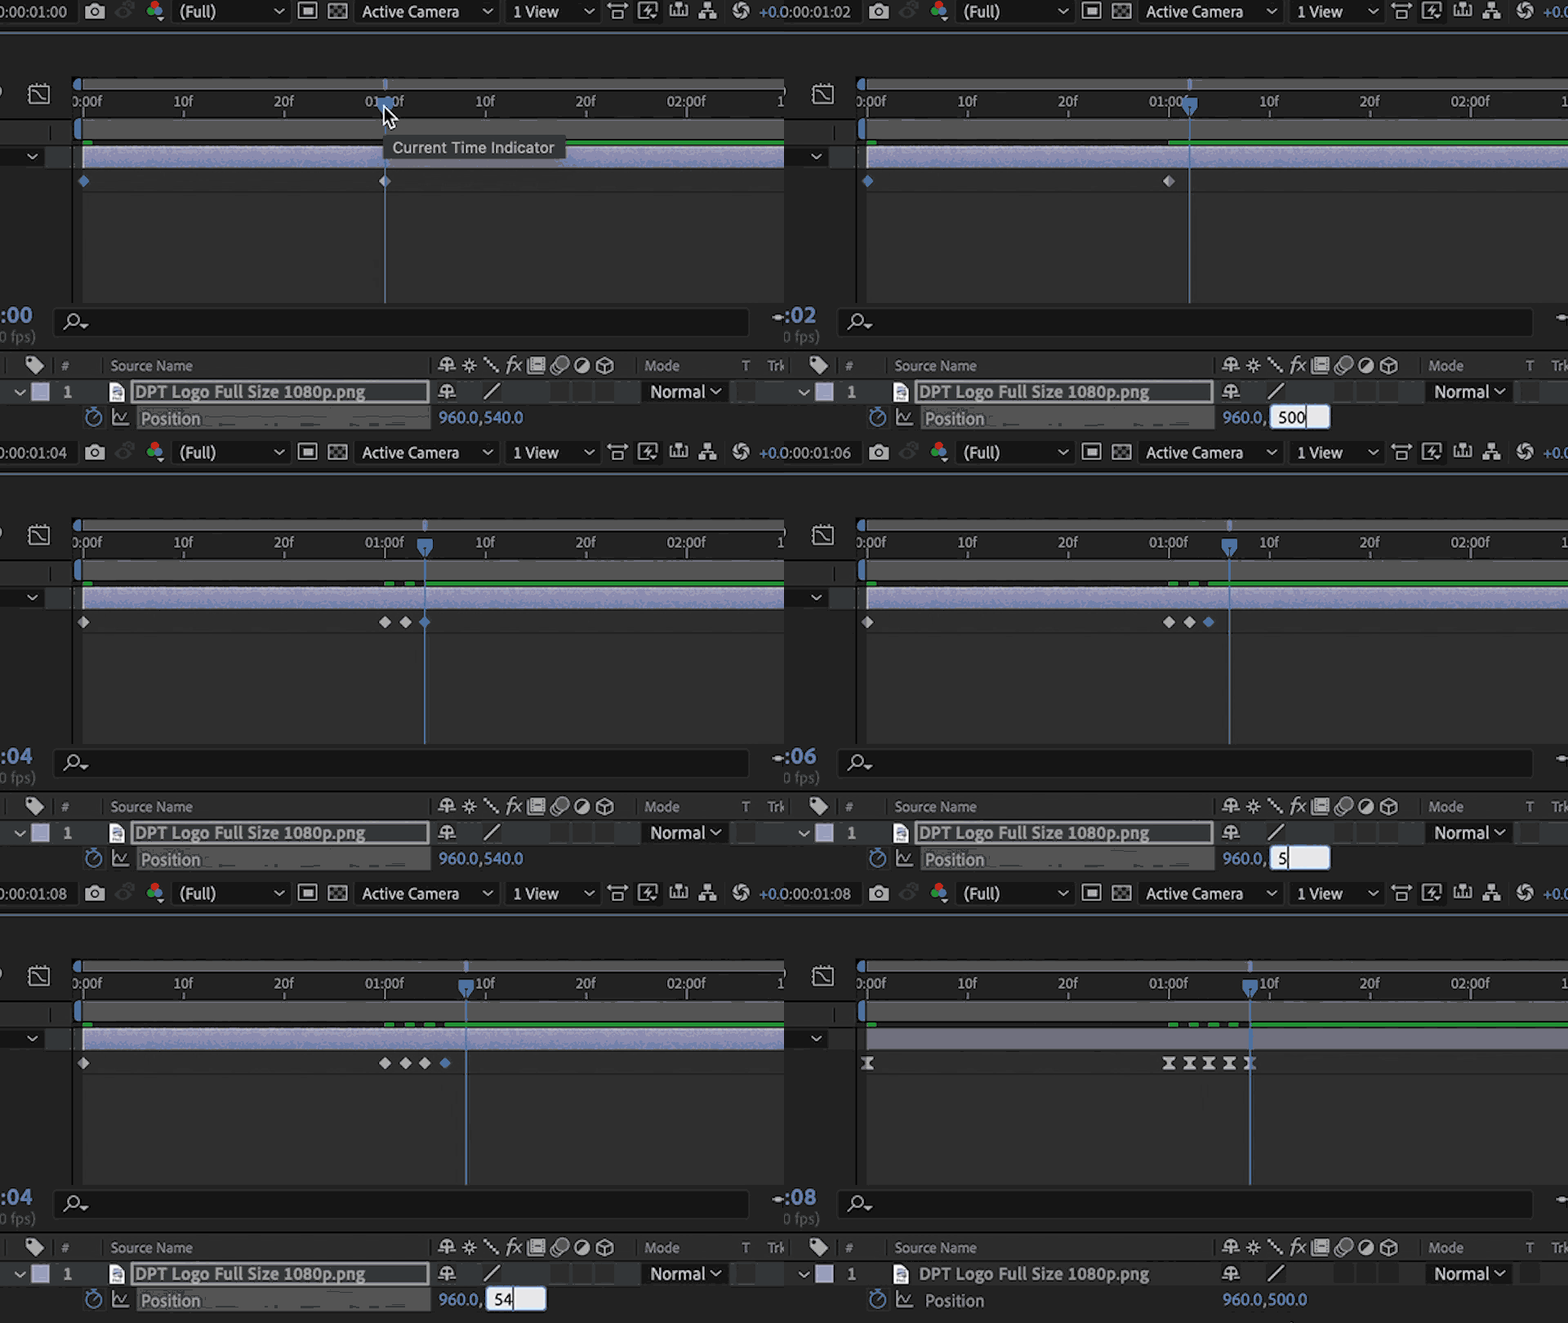
Step 1. Set your first and last keyframes (remember the values of your last keyframe or copy the keyframe)
Step 2. Move along two frames (CTRL/CMD + Arrow keys) and then alter the value of the axis you want to bounce on by 40 (you can alter this later if you choose). For me, this is the y-axis.
Step 3. Move along two frames and paste or type in your original end position keyframe
Step 4. Move along two frames and then alter the value on that axis again by 20.
Step 5. Move along two frames and paste or type your original end position keyframe.
Step 6. Add ‘Easy Ease’ (F9) to all keyframes to smooth out the motion. Also, add motion blur to the comp and layer if necessary.

Now watch your animation and behold a subtle bounce at the end of the layer/object’s movement. You can change the elasticity and gravity by moving the keyframes further apart from each or closer together and then altering the axis value depreciation. I went from 40 to 20 to 0, in terms of change but you can choose whatever values you like. You can of course add more bounces by replicating steps 2-5 and adding more values with a higher start position.
It’s not working smarter, that’s for sure but it gets the job done, which is sometimes half the battle. Though, honestly, if you go to the trouble above you could learn to manipulate the expression instead in the same amount of time. But hey, now you have both options up your sleeve.
Et Viola!
And that’s it, there’s not much more to say other than get practicing and get animating!
Let me know in the comments if this was useful and what you would like to learn more about so that I can create more content like this for you.
For more After Effects expression training, check out my article on the wiggle expression:

And also some of the most underrated shortcuts for After Effects out there:

DigiProTips


